

Airplane propeller - ceiling lamp – 3D printed project

3D printed airplane propeller as a ceiling lamp (decoration). Project is not finished yet, bulb has to be added, some kind of holder, electricity...
-
Step 1:
This is probably the most demanding project we ever did – 3D printed (7 pieces!) vintage airplane propeller. It will be a custom decoration ceiling light for a local aero-club (LED bulb will be added in center of propeller). It is 120 centimeters long and that makes it the biggest model we ever worked on.
The basic 3D model was created in PARTsolutions software and separated in 7 pieces in order to make it possible to 3D print it. Make sure that all measurements are in order and filament is strong enough.
-
Step 2:
In this case, 3D printing will take many hours, so be patient and keep your eye on it. Once all 7 pieces are printed, it is time to put them together. Small thin templates are made to mark holes and drill it.

-
Step 3:
Wooden pins will be needed and two component epoxy adhesive. Once you apply epoxy adhesive, clean residue around the joints and hold it will your hands for a while, 5-10 minutes should be enough.

-
Step 4:
Improvisation: clothespins helped to keep it tight and secure during the next 24 hours. Some small parts will remain when removing it, but it will be sanded down anyway. Make sure to leave it in vertical position.

-
Step 5:
You can test if everything is glued right (day after) by gently bending it. If it does not move, you did a good job. Now you can glue another part and apply body filler (automotive industry) on the previous joint to save your time. Considering propeller parts are oval, you can use some kind of thin plastic card when applying body filler which you can bend and adjust to the surface.

-
Step 6:
As you can see, some parts do not match each other perfectly well, so you will need extra body filler and a lot of sanding. Still, this is something what you can fix and, once the procedure is done, all those joints will not be visible and surface will be smooth. It will take several layers of body filler and each of them must dry for 24 hours before applying the next layer (you also have to sand it down a little bit).

-
Step 7:
Sanding…. OK, prepare yourself for this one, because it will take many, many hours of sanding. Protect your lungs and wear a respirator mask, there will be a lot of dust. Also, it is a good idea to wear gloves, otherwise you can say goodbye to your finger nails. This is a forward-backward procedure, because you will see where you need more body filler once the top surface is sanded. You can start with 350 sandpaper and finish with 600 or 800.

-
Step 8:
Once you are satisfied with the results, you can apply another layer of body filler, but this time with spray gun. This type of body filler is in a liquid form and you have to be sure to mix everything right. Again, a respirator mask is a mandatory! Start slowly, make sure to cover everything and leave it for a day to get dry.

-
Step 9:
Here we go, again – sanding, sanding, sanding… We used 600 and 1000 sandpaper as a last step before painting in order to get really smooth surface. Once you start, all small imperfections, holes, scratches will show up, so make sure to sand it down until everything is perfect. This step is very important, take your time and check everything twice.

-
Step 10:
Once sanding is done, clean everything with alcohol to remove dirt, dust and the grease/oils from your hands. Even although the propeller will be silver metallic, we have to paint it in black first. Why? Because some spots can appear later on. Black paint will make everything even and it will also cover small imperfections. Start with thin layer first, then thicker ones. Three layers should be enough. Check all edges, corners and let it dry for a while.

-
Step 11:
Almost there… Again, the same procedure: make sure to clean surface with alcohol before paint job. We got beautiful metallic silver paint and applied many layers considering we had black paint earlier. Also, more coats of paint will make surface even smoother. It is very important to check is there any bugs, paint drips or anything else on propeller before clear coating.

-
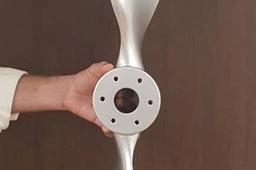
Step 12:
Finally, the propeller is clear coated (5 coats) and this is the finished product. Everything looks shiny, smooth and it looks like it is made as one piece propeller and that was our goal – to make it look like the real one. Very soon, LED bulb will be added in center and it will serve as a custom ceiling lamp. We spent many hours of work, but it was worth it.
Hope you like this tutorial and hope it will inspire you to make your own custom project!


