

How do i add thickness to a polyline in Rhinoceros 3D

hi Mark Goody,
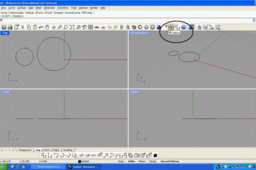
following picture can guide you to add thickness to any curves
by adding few simple steps while modelling.
-
Step 1:
Draw curves and type ( in command Bar ) or click on "options" icon

-
Step 2:
In rhino options click " Appearance "

-
Step 3:
As soon as you click " Appearance " a drop down pop up will open
as " Advance setting "
-
Step 4:
Click in the " Advance setting " button , you will see " Advance Display setting "and then click on any viewport names ,
in this tutorial I have used wireframe .
-
Step 5:
At the bottom of the pop out menu ( Rhino options ) you will find a copy button,
this button will make a duplicate copy of the selected viewport. Thus as soon as you hit the button ..
-
Step 6:
immediately a " Display mode options " window will open, that says " copy of wireframe"

-
Step 7:
Now under " copy of wireframe" we can see " -objects " which is further
having settings for various objects namely ; points, curves, surfaces and meshes . As we need to add width thickness on the curves ( polylines, ect)
click on curves button/ tab , upon that you will see " Curve width pixels "
-
Step 8:
edit that column as per your requirement ( I have edited it to 5 pixels ).
than press/ click " ok "
( the settings gets saved)
-
Step 9:
Now select the curve you want to add thickness to ( I have selected a circle )

-
Step 10:
now in command bar type ( keep curve selected )
" setobjectdisplaymode "
and press enter key
-
Step 11:
Choose attribute for selected object
( the selected curves will show the changes only in the active view , i.e in the view in which it is displayed )
click on " mode "
or type " M " in key board and press the space key
-
Step 12:
ON clicking that you will see all the viewports including " copy of wireframe " ( which we recently created. Choose " copy of wireframe "

-
Step 13:
As soon as you click on the " copy of wireframe "
the command gets over and you find that the curve which is selected have a
different width thickness than other curves. This change in display can be
reversed by same method
( just click on " user view " in choosing attributes )
-
Step 14:
Enlarge the veiwport and inspect, this will not change its apperence in other viewports , you will have repeat same steps in different veiwports in order to see the effect

-
Step 15:
Now if you want to see the similar kind of effect in you prints also than he
under object properties
-
Step 16:
There is print width option in the bottom of the op out menu.
by default its layers , so click on that and..
-
Step 17:
edit the value

-
Step 18:
Than go to print command

-
Step 19:
As soon as you execute the command you can see the
curve in different width in the print preview.
-
Step 20:
I hope this is helpful :)

-
Step 21:

