

Project Curve Siemens Nx 10

Project Curve
-
Step 1:
Step 1:
Open the part file Project_Curve_model.prt.
-
Step 2:
Step 2:
Select Curve tab > Derived Curve group > Project Curve to display the Project Curve dialog.
-
Step 3:
Step 3:
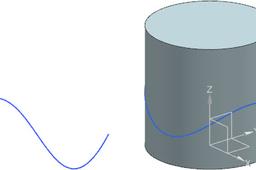
The Select Curve or Point selection step should be highlighted in the Curves or Points to Project pane. Pick the indicated curve in the Graphics window.
-
Step 4:
Step 4:
Select the Select Object selection step in the Objects to Project To pane.
-
Step 5:
Step 5:
In the Graphics window, pick the indicated face on which to project the curve.
-
Step 6:
Step 6:
Set the Direction drop-down to Along Vector and then with the Specify Vector selection step highlighted, pick the Y-axis as indicated.
-
Step 7:
Step 6:

-
Step 8:
Step 7:
Activate Associative under Settings pane. -
Step 9:
Step 8:
Click OK create the projected curve feature.
