

TideMaster Tide Gauge


basic understanding of Sea level measurement by TideMaster Tide Gauge, Enjoy (:
-
Step 1: Tide Gauge
It is one component of a modern water level monitoring station, is fitted with sensors that continuously record the height of the surrounding water level. This data is critical for many coastal activities, including safe navigation, sound engineering, and habitat restoration and preservation.

There are two primary reasons for measuring sea level are observing global sea level change and sea level hazard event research. Acoustic, hydrostatic pressure and radar tide gauges provide precise relative sea level data but can be greatly influenced by variances caused by vertical land signals and the stability of the surface they are built upon.
-
Step 2: Old & New installation of Tide Gauge
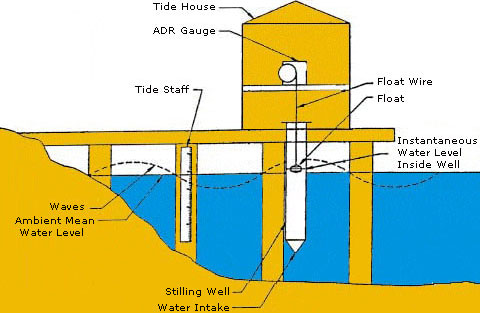
Before computers, (Tide Houses) were constructed to shelter permanent water level recorders, protecting them from harsh environmental conditions. In this diagram, we can see how the analog data recorder is situated inside the house with the float, and the stilling well located directly beneath it. Attached to one of the piers' pilings is a tidal staff. This device would allow scientists to manually observe the tidal level and then compare it to the readings taken by the analog recorder.

While similar in design to older tide houses, "newer tide station enclosures" are designed to protect sensitive electronics, transmitting equipment, and backup power and data storage devices. The older stilling well has been replaced with an acoustic sounding tube and the tidal staff with a pressure sensor. The new field equipment is designed to operate with the highest level of accuracy with a minimum of maintenance, transmitting data directly back to NOAA headquarters for analysis and distribution.
-
Step 3:
The computer age led to tide gauges that use microprocessor-based technologies to collect sea-level data. While older tide-measuring stations used mechanical floats and recorders, modern monitoring stations use advanced acoustics and electronics. Today's recorders send an audio signal down a half-inch-wide "sounding tube" and measure the time it takes for the reflected signal to travel back from the water's surface. Data is still collected every six minutes, but while the old recording stations used mechanical timers to tell them when to take a reading, a Geostationary Operational Environmental Satellite (GOES) controls the timing on today's stations.
In addition to measuring tidal heights more accurately, modern water level stations are capable of measuring 11 other oceanographic and meteorological parameters, including wind speed and direction, air and water temperature, and barometric pressure. NOAA uses this information for many purposes, among them to ensure safe navigation, record and predict sea-level trends and other oceanographic conditions via nowcasts and forecasts, and publish annual tide predictions.

-
Step 4: Tidemaster
The TideMaster tide gauge has been designed to provide an accurate, versatile and easily deployed tide gauge for use in short or long term hydrographic survey operations. It can be configured with either a traditional vented pressure sensor or a VRS-20 radar level sensor.
The Tidemaster is the cost-effective way to accurately record water height, with the added option of gathering meteorological data using its ultrasonic wind speed and direction sensor.

-
Step 5: VRS-20 Radar Level Sensor
Many of the issues traditionally associated with water level measurement have been solved in the VRS-20 pulsed K-band radar level sensor.

The VRS-20 is a pulsed k-band radar level sensor developed by Valeport to work seamlessly with Valeport's TideMaster and TideStations.

-
Step 6: Specifications of VRS-20
Minimum Range: 0.8 m
Maximum Range: 20 m
Beam Angle: ±6°
Frequency: 25 GHz
Accuracy: ±10 mm
Precision: 1 mm

VRS-20 radar Mounting surface

-
Step 7:
- Levelling
The VRS-20 needs to be parallel to the water surface for reliable and consistent operation. To aid
this, the sensor has been fitted with two bubble levels. Once the clamp or mounting bracket is firmly
fixed to the mounting surface the two axis adjustment on the bracket can be adjusted until the VRS-20 is level.
- Wiring
The VRS-20 is supplied as standard with a 5m cable (Other lengths are available on request). The
cable is glanded into the VRS-20 at the sensor end, and issued as unterminated cable at the other
end. This is to allow easy routing of the cable through walls/bulkheads etc.
- Junction box
The cable from the VRS-20 sensor terminates into a small junction box.
The bare cable from the VRS-20 should be passed through the cable gland and terminated in the
push fit connectors with reference to the wiring schedule.
To insert the bare wires into the terminals, push in the orange tab in with a fine screwdriver and
release to clamp the wire. Check the wire is securely clamped by pulling gently on the wire.
The output from the junction box will depend on the configuration of the VRS-20.

- Communications
For use with the TideMaster, the VRS-20 will be set up via the TideMaster and TideMaster Express
software.
Please refer to the TideMaster manual https://www.valeport.co.uk/content/uploads/2020/03/VRS20-Radar-Level-Gauge-Operating-Manual-0745813c.pdf
-
Step 8:
Regards,,
ENG. Abdullah Dhabban