

How to upload files to GrabCAD Workbench?


Here is how I created a new Workbench project and a few different ways I uploaded SolidWorks files. This is was also my first time using the upload folders option so I came across a few bugs that I am sure will be worked out but they are not a big deal. Please feel free to leave comments if this worked for you or if you have a different or better way to do it.
I will tell you how to start your Workbench project and upload SolidWorks files. I am assuming you know how to create your files. For this tutorial, I will upload a .zip file containing all of the part and assembly files. You can make this many ways but one of the best ways is to use the Pack-and-Go option in SW. Many other CAD programs have a similar option and this makes sure all the required files are included.
-
Step 1:
After logging into GrabCAD, click on your image icon in the upper right corner of the screen and then select "Create."

-
Step 2:
Select the "Workbench Project" option on the right.

-
Step 3:
Type a name for your project and click save.

-
Step 4:
Your project will open and in the center of the screen there will be an area you can drag and drop files to or you can choose the little blue text "select files." Then find the files you want to upload on your computer. I chose to upload my .zip file as well as an IGES and STEP format of my assembly for use in the 3D viewer.
After selecting the files, click "Open."

-
Step 5:
A screen with the progress of your files uploading will appear. You will need to wait for your files to upload before you can move from this page. While this is happening, you can provide a description of the files that will show in the project updates.

-
Step 6:
When the upload has completed you can select "Done."

-
Step 7:
Now you can see the uploaded files on the left side of the screen.
Note the red #D icon nest to the IGES and STEP fiels...

-
Step 8:
If you select one of these files, the 3D viewer will open automatically and you can view the file in your browser. Each different format has variations as how it will work in the browser and I personal think the native formats usually work best. (But Fusion360 for GC on the Mac cannot edit SW fiels yet so these universal files are still nice to have.)
Good thing that GrabCADs viewer can view SolidWorks Assembly files without needing all the part files too!

-
Step 9:
Lets upload our assembly fiel to see how this works.
On the left side of the screen click Upload and then files.
(Firefox does not allow folder uploading I will show this later in Chrome)

-
Step 10:
Find the Assembly file on your computer, select it and choose open.

-
Step 11:
Again a progress bar will open and you leave a comment as to what the new file you are uploading is. When it is done and turns green, select "done."

-
Step 12:
If we now take a look at this file in the 3D viewer, we can see that it open without the need for all the part files and sub-assemblies. It also look different from the universal formats. (a few tangent lines are no longer there and materials are closer to original.)
But there is no point to Workbench without collaborators!!!

-
Step 13:
GrabCAD's Workbench allows for three different types of Collaborators.
I invited Hardi to be a "Project Owner." This allows Hardi to invite additional collaborators, and remove collaborators, as well as upload, comment, download and delete files.

-
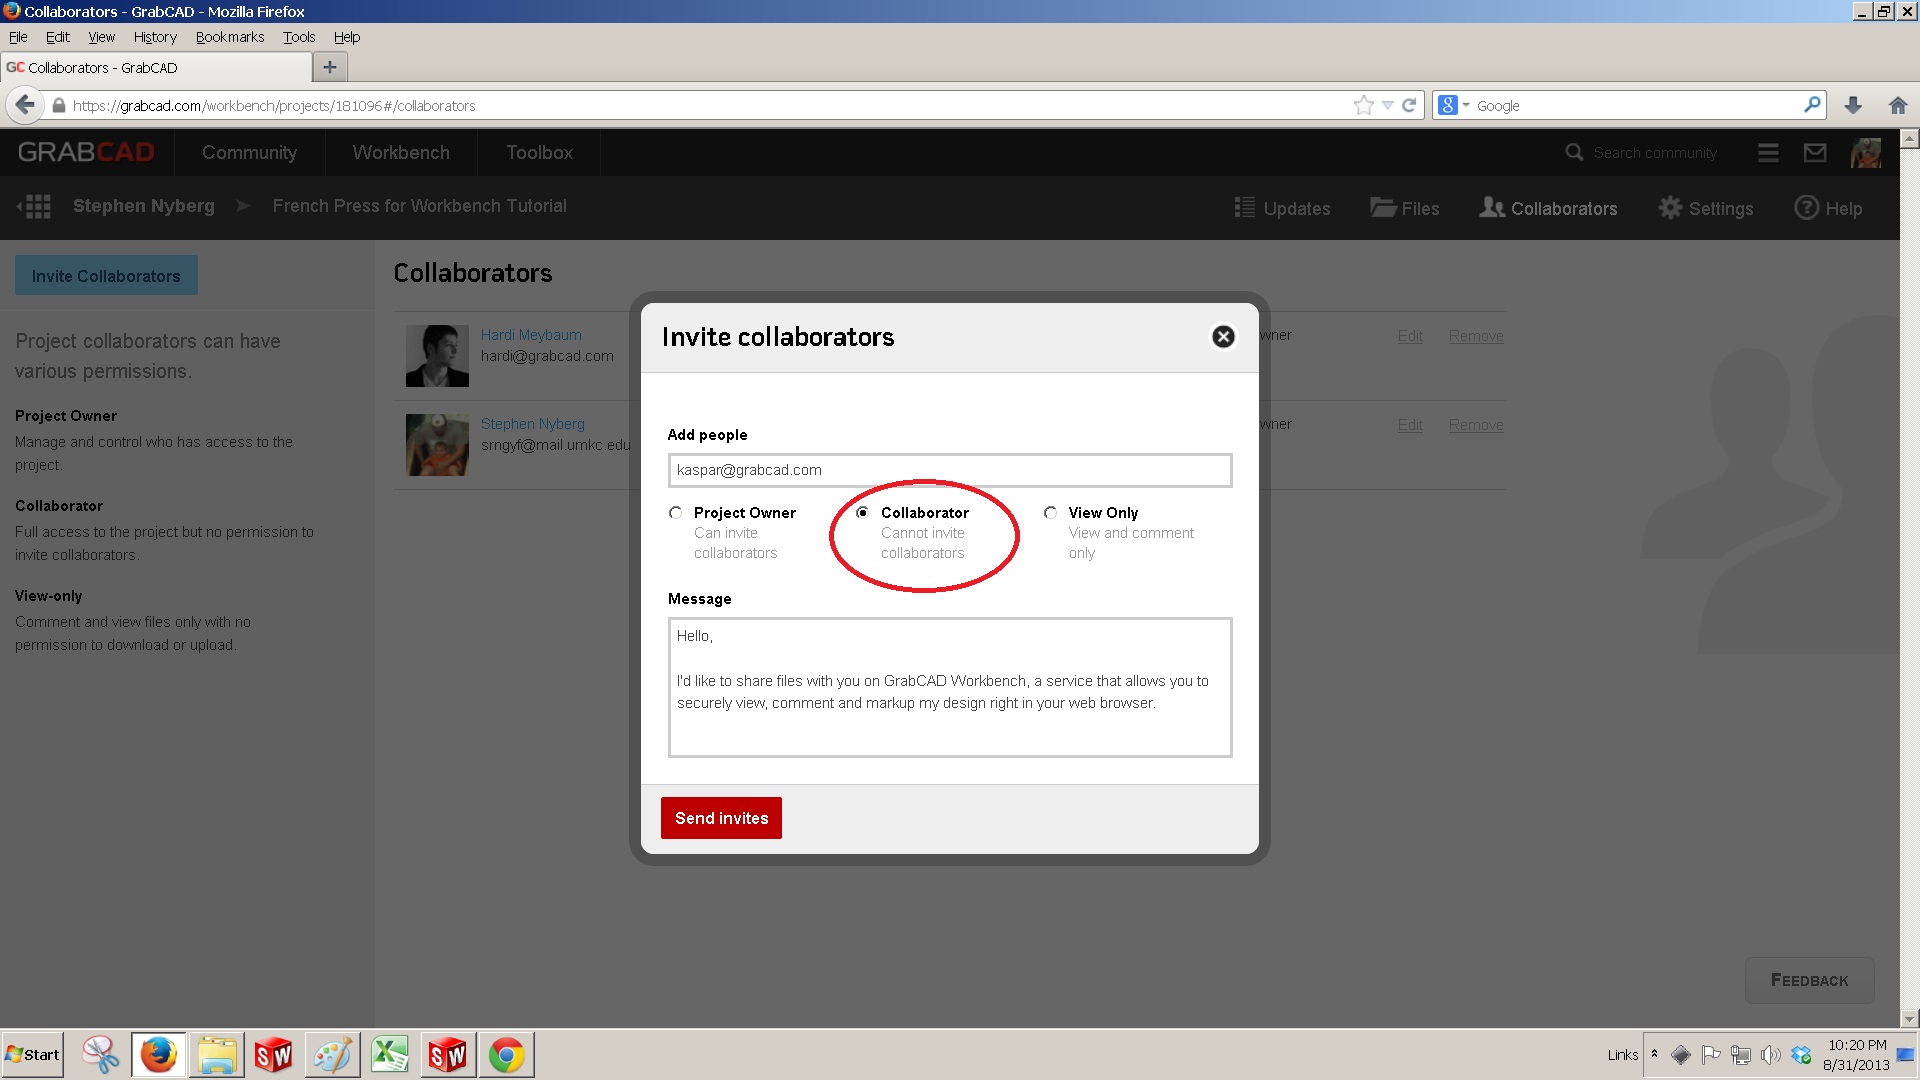
Step 14:
I invited Kaspar as a colaborator. He can upload and download files as well as comment and place pins on the projec but is not able to invite new collaborators.
-
Step 15:
I invited Sara as a collaborator but only gave her "view only" permission. She will be able to see any renders comments on the project as well as view 3D files in the viewer and leave comment with pins, but she will not be able to download or upload files.

-
Step 16:
Here are all of the collaborators on this project and as a project owner, I have the ability to change their permissions or remove them from the project.

-
Step 17:
My Firefox would not allow me to upload folders so to show this I needed to use Chrome.
After logging into GrabCAD, to get to your Workbench projects, click on Workbench at the top and center of the webpage and then on your projects.
(NOTE: This may look slightly different depending on what tear of Workbench you have)
-
Step 18:
A new window will appear with all of your Workbench projects. Select the one you want by clicking on it.

-
Step 19:
The default window will be the project updates page that shows all the recent activity to the project.
To view and upload new files click on the files button near the upper right hand side.

-
Step 20:
This was my first time using the upload folders options so I had to do it a few time to figure out the best way. I had a folder with three sub folders each containing different types of files. If you just upload the main folder, all of the files from all the sub folders will be uploaded into the single file folder selected in your Workbench project. I did not want this so lets first create some new folders.
at the right of the screen click new and then select new folder.
I named this folder "SW 2011 files"

-
Step 21:
A single Sub-folder will be created when you upload your folder.

-
Step 22:
With the folder you want to upload files to selected, click on Upload and then Folders. You can also click on the blue "select folders" in the center of the screen or just drag your folder from your computer to the window.

-
Step 23:
Select the folder from your computer that contains the files you want to upload.
(NOTE: SW 2012 files folder selected. Sub-folders are not there yet)

-
Step 24:
Again you will get a progress bar where you put notes as to what the uploaded files are. When the upload is complete, select done.

-
Step 25:
And now you will see your sub-folder with the files in it.

-
Step 26:
Repeat for the parts folder...

-
Step 27:
and drawings.

-
Step 28:
For some unknown reason, both the part and assembly files uploaded a duplicate file with a ~$ prefix that did not work. These were not in my original file folder on my computer so I deleted them.

-
Step 29:
If you select the folder containing the files, place a check in the box to the left of the files you wish to delete and then select Delete at the top.
