

Tutorial: How to use Creo Simulate Lite in PTC Creo and show design intent

Here is the short tutorial for you
-
Step 1:
Create your model (200 surfaces max.)

-
Step 2:
Select Application >> Simulate

-
Step 3:
System open the Process Guide window for you - click Next>> (button)

-
Step 4:
In Process Guide window select assign (do you need to assign Material for your model)
Then select Next>> (button)
-
Step 5:
Now do you need to set the constraints for model - select constraints In Process Guide window
You can set Displacement constraint or ...
-
Step 6:
... Planar constraint or ..

-
Step 7:
... Pin constraint or ..

-
Step 8:
... Ball constraint
for continue select Next>> (button)
-
Step 9:
Now set Loads
Note: in Creo Simulate Lite you can set Force Load - it is not possible set Momentsfor continue select Next>> (button)

-
Step 10:
Click this link to RUN an analysis

-
Step 11:
System open the Diagnostic window for you. Select Next>> (button)

-
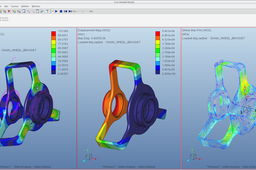
Step 12:
View results of the analysis - click results link

-
Step 13:
System open the Creo Simulate Results window for you (you can save this analysis, print, etc.)

